Did you know that DIY deck repairs can save you up to 30% compared to hiring a professional? Many homeowners are taking matters into their own hands for deck maintenance. Decks face the elements all year, leading to rot, splinters, and warping.
Fixing damaged deck boards is crucial. It’s not only for looks but also to keep your outdoor space safe. You’ll ensure your family and guests are safe.
This comprehensive step-by-step guide will teach you about deck repair. We’ll show you the tools and materials needed and the best ways to replace damaged boards. By the end, you’ll know how to make your deck look and feel new again.

Key Takeaways
- DIY deck repairs can save up to 30% in costs.
- Rot, splinters, and warping are common deck issues.
- A proper step-by-step guide is crucial for successful deck board replacement.
- Essential tools and materials are necessary for an efficient repair process.
- Regular maintenance can prevent future deck damage.
Introduction to Deck Repair
Keeping your outdoor area in good shape is key to keeping your deck looking great and lasting long. No matter if it’s a wood deck or a composite deck, staying on top of upkeep and fixing things early can save a lot of time and money.
Knowing what your deck is made of is important when fixing it. A wood deck and a composite deck each need different care and fixes. Wood decks are beautiful but might need fixing due to rot or damage from weather. Composite decks handle weather better but can fade or get damaged on the surface over time.
A detailed deck repair guide can show you how to spot and fix different damages. Having the right info can really help, whether you’re fixing small cracks or bigger issues.
Tools and Materials Needed for Deck Board Repair
Before starting your deck repair, gather all the tools and materials you need. This will make the process smoother and faster. You’ll be ready for each step without delays.
Essential Tools
To fix a damaged deck board properly, you must have the right tools. You’ll need:
- A reliable pry bar to take off the old boards.
- A power drill to put in deck screws quickly.
- A measuring tape for accurate new board measurements.
- A circular or hand saw to cut the new board to size.
- Sandpaper or an electric sander to smooth the board edges.
Each tool has a role that helps make the repair easier. They help you get a quality finish.
Materials You Will Need
You also need the right materials. Make sure you have:
- Quality deck screws for a tight fit of the new board.
- A good wood filler for fixing small flaws smoothly.
- A matching new deck board in size, type, and finish.
Inspecting the Deck for Damage
Before starting repairs, it’s key to inspect the deck fully. This lets you spot any issues early on. It helps plan out the fix more smoothly.
Identifying Signs of Rot, Splinter, and Warp
First, check for rot in places where water gathers or the wood looks off. Then, look for any damaged board with a splinter or warp. These signs show that the deck needs quick help.
Determining the Extent of Damage
Once you’ve spotted damage, figure out how bad it is. See if the trouble is just a few boards or more. Small issues might just need simple fixes. But big rot problems could mean replacing whole boards. Knowing how big the problem is helps pick the best repair way.
Preparing the Deck for Repair
Getting your deck ready for repairs is a must. This means taking a few key steps to make sure everything goes smoothly. A clean deck is key to getting the best outcome.
Cleaning the Deck Surface
First, choose a top-notch deck cleaner. It helps get rid of dirt, mildew, and other stuff that might get in the way of fixing the deck. Scrub gently to ensure the deck is clean and free from any grime. A thorough clean lets you spot areas that need fixing and prep them well.
Removing Furniture and Obstacles
It’s important to clear the deck before starting repairs. Take all furniture, plants, and any barriers off the deck. This gives you space to work freely and keep your focus. Make sure your stuff is safe from dust and cleaning products while you work.
Using a Pry Bar to Remove the Damaged Deck Board
Using a pry bar correctly is key to efficiently take out damaged deck boards. Knowing and following safety steps ensures the job is done safely.
Safety Precautions
Before you use a pry bar, wear safety gear like gloves and glasses. These protect you from splinters and flying debris. Always check under the deck before you start. This helps avoid harming any structures underneath when you remove the damaged board.
Tips for Easy Removal
Pry bar placement is important for good leverage. Begin at one end and move to the other, lifting gently. This prevents the board from breaking. Having someone help hold the board makes the job easier and quicker. By following these tips, you can safely and smoothly remove the damaged board.
Measuring and Cutting the New Board
When replacing boards on your deck, being precise matters a lot. Measuring accurately and cutting right makes a huge difference. It helps avoid the need to redo work because of mistakes.
Accurate Measurements
First, measure the length and width where the new board will fit. Board sizes might change because of the weather affecting the old decking. Use a tape measure for accuracy and double-check your numbers before cutting.

Cutting Techniques
With the right measurements in hand, it’s time to cut your new board. The cutting method you choose depends on the wood and your tools. A circular saw is best for straight cuts on most deck boards.
Always cut the board a bit too long at first. Then, you can trim it to the perfect size. It’s important to sand the edges after cutting to make them smooth. This prevents splinters.
Installing the New Deck Board
After removing the old board and getting the area ready, it’s time for installing the new deck board. It’s a key step to make sure your deck is secure and smooth.
Placing the New Board
Put the new board where the old one was. Make sure it lines up with the other boards. This keeps the spacing even. Taking time to do this right keeps your new deck looking good and stable.
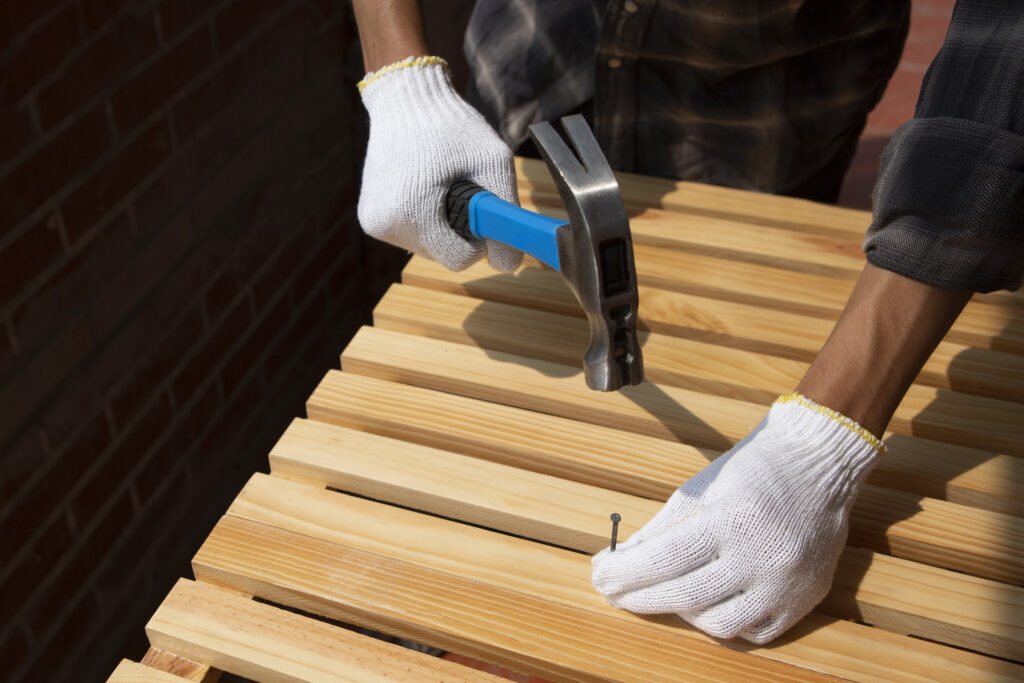
Securing with Deck Screws
With the board set, fix it using deck screws. Start with pilot holes to avoid splitting the wood. Then, drive the screws so they’re either flush or a bit under the board’s surface. Doing this right makes sure your deck stays secure and lasts longer.
Finishing Touches: Sanding and Staining the New Board
Replacing your deck board ends with sanding and staining. These steps make sure your deck looks unified and feels smooth. Paying attention here means a better finish overall.
Sanding for a Smooth Surface
Start with sanding. Use a good sander to smooth out the wood. This gets rid of any rough spots that might give you splinters. Sanding prepares the wood for staining and guarantees a smooth, even finish. Go over every inch to match the new and old boards perfectly.
Staining for a Consistent Look
After sanding, it’s time to stain. Pick a stain that looks like your deck’s original color. This keeps the deck’s look the same. Use a brush or rag to apply the stain evenly. Doing this makes sure the stain goes deep into the wood, looking great and keeping it safe.
Sanding and staining with care makes your deck repair look seamless. It’ll match the rest of your deck perfectly.
Sealing the New Deck Board
After you install your new deck board, sealing it is a must to protect it from the weather. Doing the sealing right will help your deck last longer. Here’s what you need to know:
Choosing the Right Sealant
Think about the wood type and your area’s climate when picking a sealant. A good sealant protects against moisture, sun, and temperature changes. Choose well-known brands like Thompson’s WaterSeal or Behr for the best protection. Reading reviews and talking to experts can also guide your choice.
Application Tips
To seal your deck effectively and make the seal last, follow these steps:
- Make sure the board is clean and dry before you start.
- Use a brush or roller to cover evenly, and be extra careful with the board ends where moisture can enter.
- Put on the sealant in thin coats to prevent drips and pooling.
- Wait long enough between coats for it to dry, as the sealant maker suggests.
- Check the deck regularly and reapply sealant when it’s necessary to keep it safe.
By keeping these application tips in mind and selecting the right sealant, your new deck board will be shielded against harmful elements. This helps it look good and stay strong for a long time.
Ensuring the Rest of the Deck is in Good Condition
It’s just as vital to keep the whole deck in check as it is to address immediate repairs. Doing regular checks helps catch problems early. This keeps your deck safe and looking good.
Start with a detailed look over. Check for loose boards, nails sticking out, and signs of rot or mildew. Areas that get wet often need extra attention since they’re more likely to rot.
Cleaning your deck regularly is also key. Clear away leaves, algae, and dirt that can damage the wood. Clean it with a quality deck cleaner and a soft brush to keep it looking great.
It’s crucial to check the deck’s support structure too. Look at the joists, beams, and posts for damage or weakness. Fixing these issues quickly can stop bigger problems later.
Make sure water can flow away by keeping gutters and downspouts clear. This keeps water from standing on your deck, which can cause mold and wood damage.
Keeping up with inspections and care makes sure your deck stays strong. By putting in the time, you protect your deck and keep it looking its best.
Regular Maintenance to Prevent Future Damage
Keeping your deck in top shape is a continuous task. Regular maintenance helps ensure it stays perfect all year.
Cleaning and Inspecting Regularly
Cleaning and checking your deck often are key steps. Dirt and leaves can build up, leading to damage or mold. Clean your deck well every month. When cleaning, also look for any damage, like loose nails or weak spots.
Addressing Minor Issues Before They Worsen
It’s important to fix small problems right away. If you see cracks or rotten spots, repair them fast. Ignoring these can cause major damage, making future repairs expensive. Regular checks help you spot these issues early, keeping your deck looking good and sturdy.
Repairing Damaged Deck Boards: Step-by-Step Guide Recap
This recap summarizes the essential steps for repairing damaged deck boards. Use it as a quick reference guide. It will help ensure you’re ready for the task:
- Begin by gathering all necessary tools and materials.
- Inspect the deck for damage, focusing on signs of rot, splinter, and warp.
- Prepare the deck by cleaning its surface and removing any obstacles.
- Use a pry bar to safely remove the damaged deck board.
- Measure and cut the new board with precision.
- Install the new deck board, securing it firmly with deck screws.
- Finish by sanding and staining the new board for a seamless look.
- Seal the new deck board to protect it from future damage.
- Review the rest of the deck to ensure its overall condition is good.
- Adopt a regular maintenance routine to prevent future issues.
By following this step-by-step guide, fixing damaged deck boards becomes straightforward. The success of your repair work depends on completing each step thoroughly. Also, doing regular checks and maintenance keeps your deck looking great.

Conclusion
Fixing your deck boards not only makes them last longer but also keeps your outdoor area looking great. This guide has shown you how to fix and refresh your deck effectively. By doing these things, you make your space safer and more welcoming for friends and family.
Starting a DIY project like this can feel very rewarding. Each repair step adds value and beauty to your home. Taking care of your deck regularly helps stop small problems from getting big, keeping your deck nice and useful.
Always remember, taking action early is beneficial. With the proper tools and methods, you can make your deck strong and lovely again. Remember these tips for your next project. You’ll surely appreciate the outcome of a well-kept deck. These last words highlight the joy and pride of doing home improvements yourself.
FAQ
How do I identify signs of rot, splinters, or warping on my deck?
Look for wood that feels soft or looks discolored. Check for visible cracks or splinters. Also, look for boards that aren’t straight or level. Regular checks are key.
What tools and materials do I need for repairing damaged deck boards?
You’ll need some basic tools. These include a pry bar, deck screws, a power drill, and a saw. You’ll also need new deck boards, wood filler, stain, and sealant for repairs.
How do I remove a damaged deck board using a pry bar?
First, wear gloves and eye protection for safety. Next, put the pry bar under the damaged board. Lift slowly, trying not to harm the boards nearby.
What should I consider when measuring and cutting a new deck board?
Measure the space for the new board accurately. Then, cut the board precisely with a saw. A good fit is crucial for a neat install.
How can I securely install a new deck board?
Put the new board in its spot. Then, fix it in place with deck screws. Ensure the screws are spread out evenly and put in tightly to stop any looseness later.
What are the best practices for sanding and staining a new deck board?
Sand the board until smooth to match the deck. Stain it evenly, going along the wood grain. This helps it blend in.
How do I choose the right sealant for my deck?
Pick a sealant made for your deck’s material. Look for ones that protect against the sun and water.
How do I ensure the rest of my deck is in good condition?
Inspect the whole deck regularly. Look for loose boards or other signs of wear. Fix small issues quickly to stop them from getting worse.
What does regular maintenance of a deck involve?
Clean your deck often with the right cleaner. Always be on the lookout for damage. Use wood filler or sealant when needed. This care makes your deck last longer.
Why is it important to address minor deck issues before they worsen?
Ignoring small problems can lead to big, costly repairs. Dealing with minor issues early saves time and money later on.